

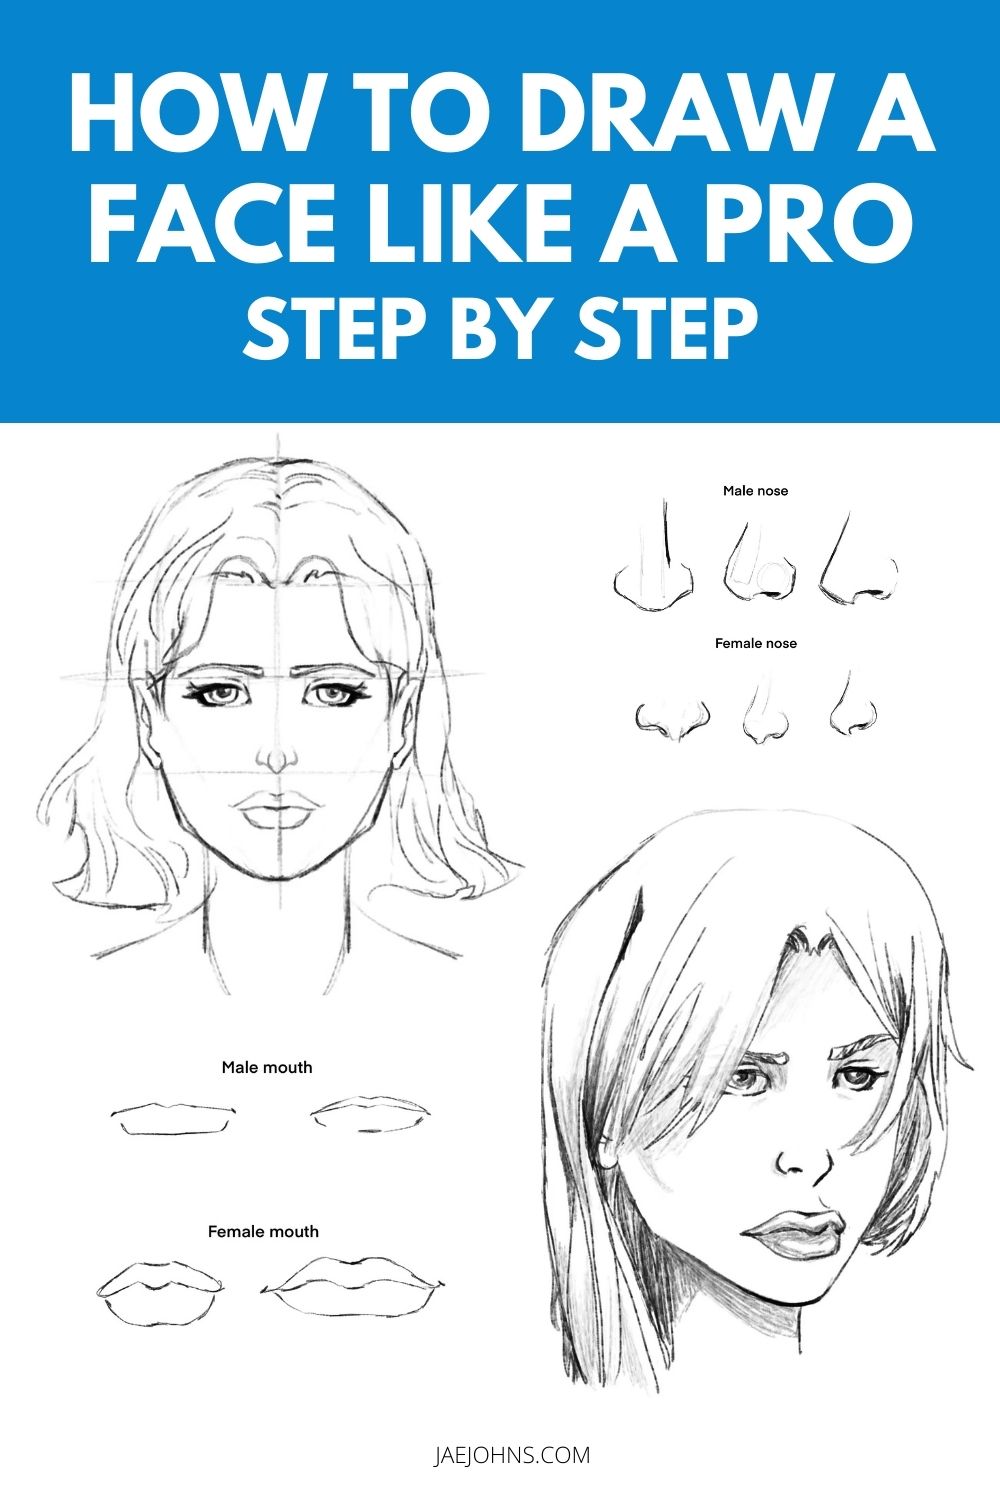
how to draw face step by step
In this article, I'll take you through two approaches to drawing faces like a pro.
In the frontal view, we take a more straightforward, more than geometric approach to the subject matter, and in the three-quarter turn, we look at a more than organic still nevertheless structured method.
Finally, we'll take a await at different ways to make a face more masculine and feminine.
Proportion and location are essential in the initial stages of learning to draw faces like a pro.
Afterward that, particular and the intricate shapes of different features are crucial. And so without further ado, let's get started with this step past footstep tutorial.
Drawing Faces from the Front – Step by Step Instructions
Beginning with any blazon of paper, yous tin can use a 4B pencil, mechanical pencil, or any other kind of professional drawing pencil of your choice.
Following this series of steps, yous'll be able to depict a face from the front end.
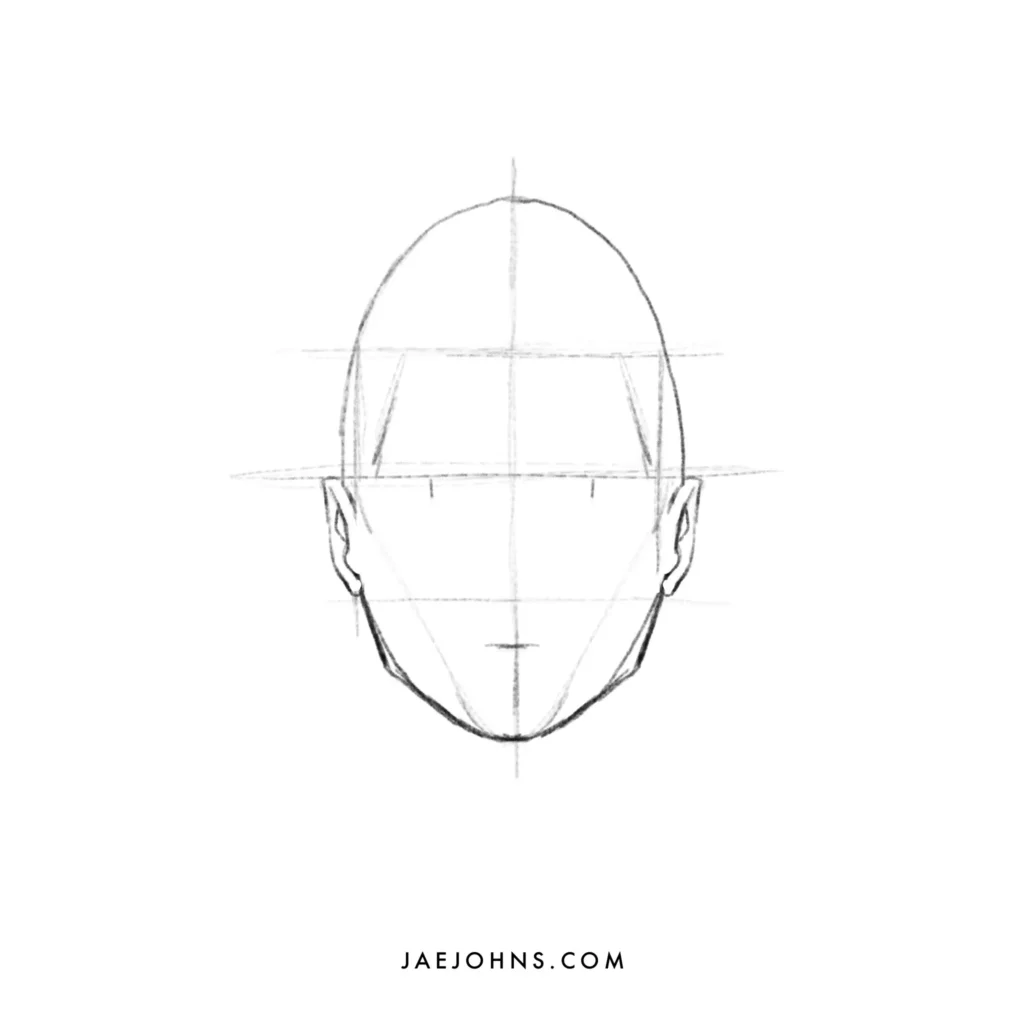
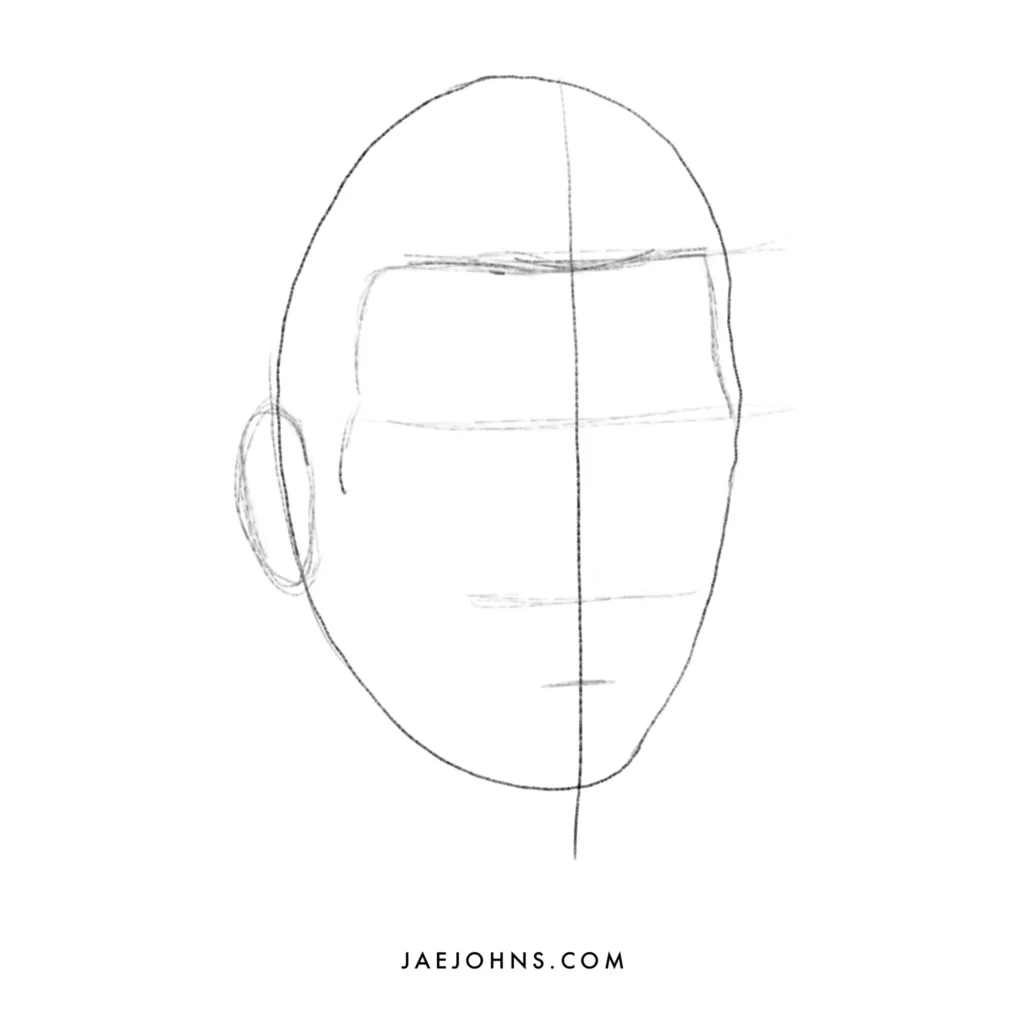
Stride 1 – Draw an Oval

First, draw a vertical centerline that will grade the symmetrical center of the face.
The front view has to be quite precise to work well on the piece of paper.
Drawing a head from imagination is quite difficult, especially from this view, and so it is important to focus on the proper facial proportions.
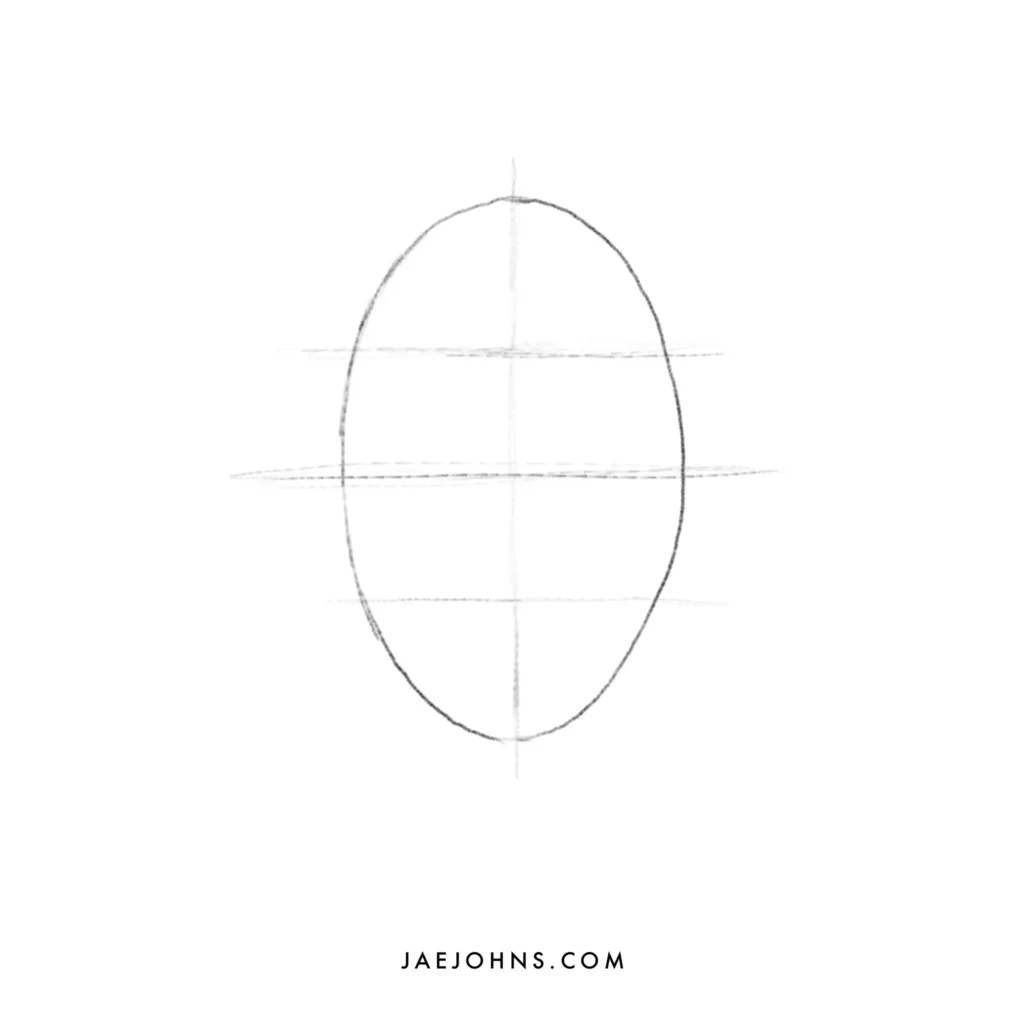
And so, describe an oval face shape over the centerline.
You're at present going to split the face into four equal-sized parts with horizontal lines forming exact guidelines for accurate proportions of the face.
The start line from the elevation is the hairline on the forehead.
The middle line volition class the browline, and the third line will be the bottom of the olfactory organ.
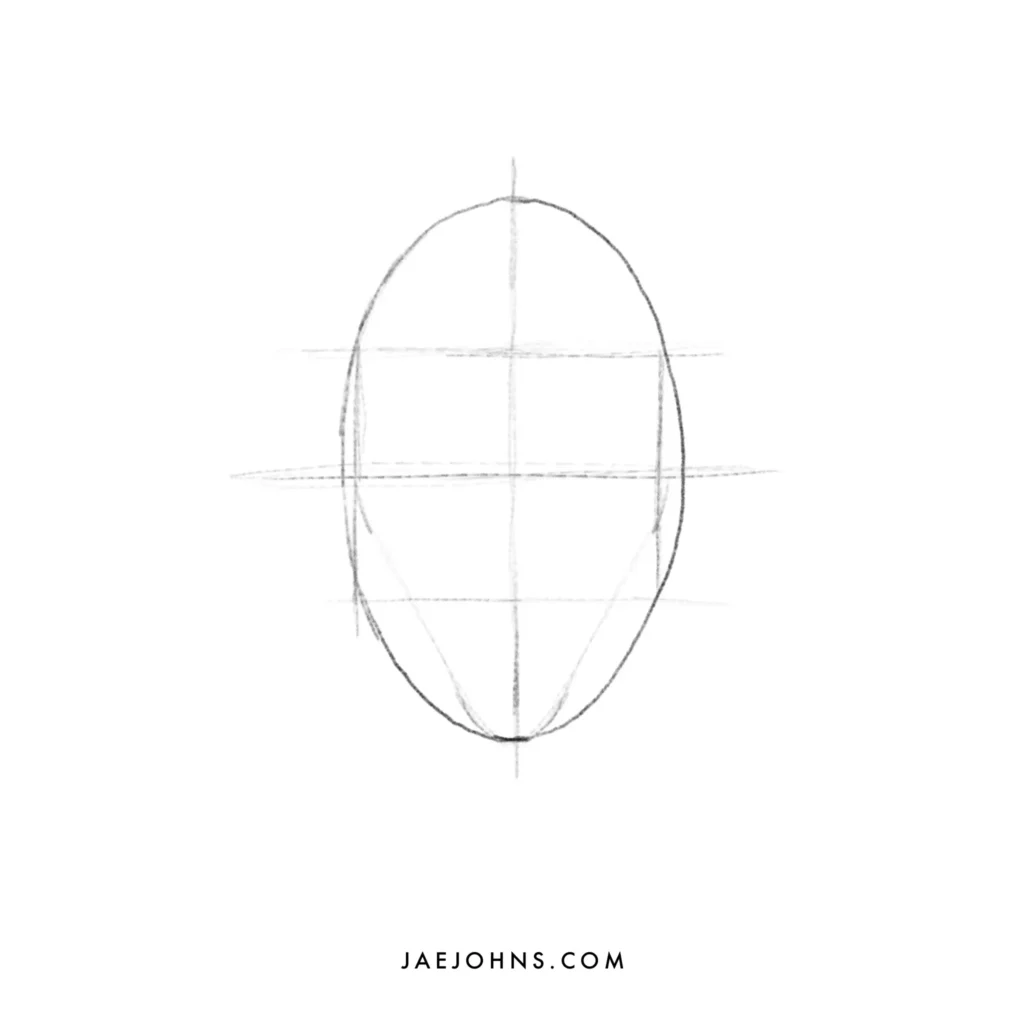
Step 2 – Describe Sidelines for Guidance

You lot should now be able to consummate a rectangular shape from the horizontal lines within the oval.
The meridian line is the hairline and the nose line is the bottom line.
You lot tin now depict the side edges of the rectangle as guidelines that will represent the edges of the face up.
Remember to use lighter pencil strokes for these initial stages as they are being used as bones guidelines and not the real lines of the portrait.
Soft pencils work well for this stage.
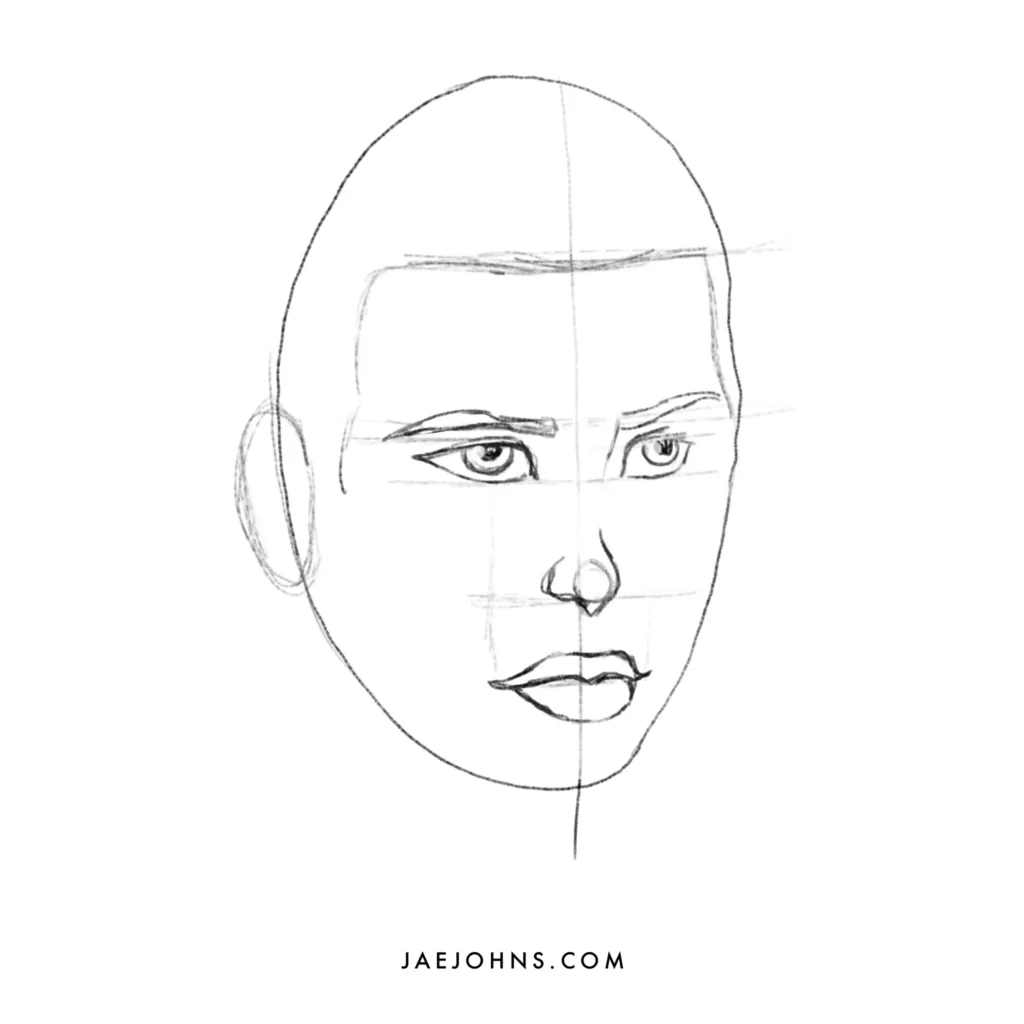
Step 3 – Drawing the Facial Construction
Using the guidelines you now have, you tin cleave out the lesser half of the face by defining the cheeks and jawbone in the bottom quadrant.

By measuring another horizontal guideline exactly halfway between the nose line and the very bottom of the chin, you'll accept a line for the jawline, with the mouth being placed just above information technology.
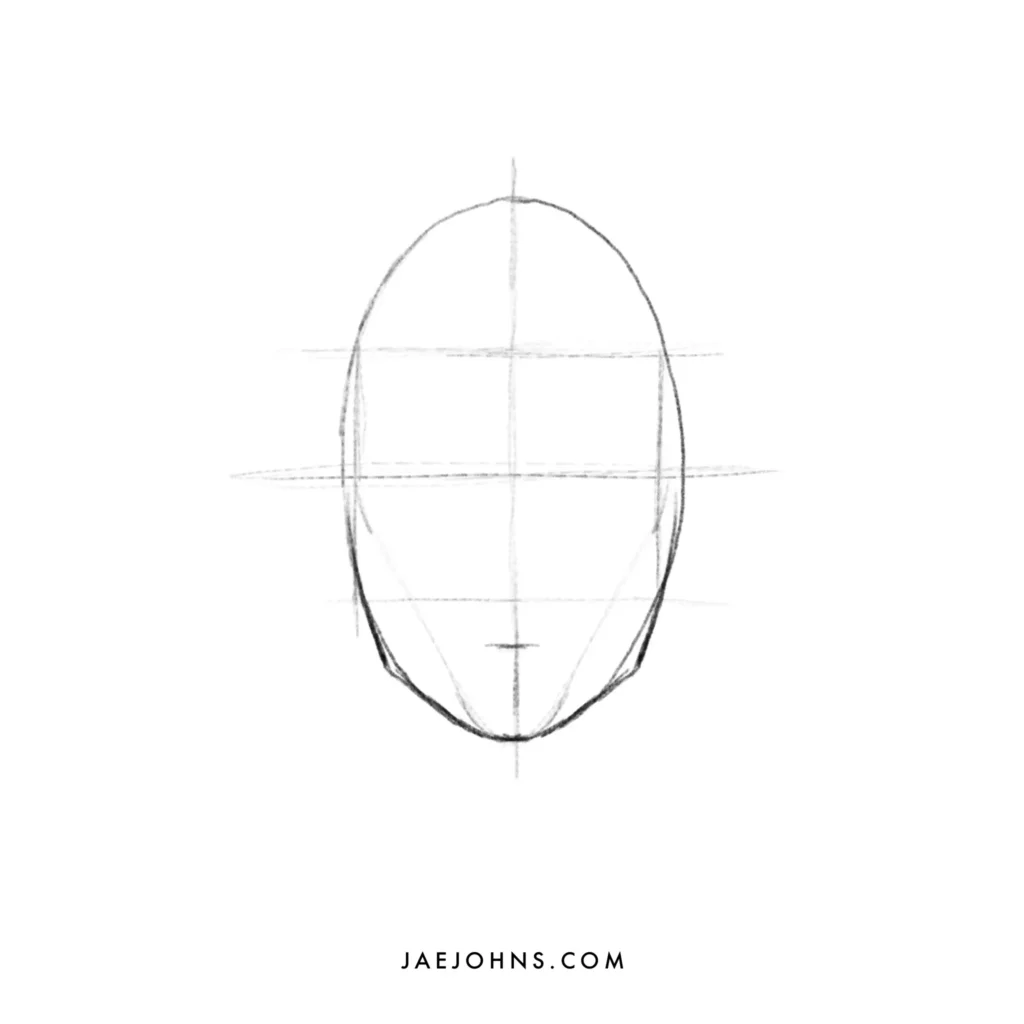
The forehead tin besides be fatigued in slightly, as another line coming in slightly inward from the temples, giving the illusion of form.
Continue checking for symmetry as you go because the frontal view requires a lot of precision.
Y'all can check with a mirror whether the symmetry is however working.
Footstep 4 – Draw the Ears

The top of the ears should match with the forehead line, where the brow bone would be, while the bottom of the ears should match with the bottom of the nose line.
The ears should extend outward further the in a higher place they go.
However, depending on the blazon of ear, the amount they extend outward can change.
Step 5 – Notice the Eyes
Nosotros now accept the bones facial construction completed.
Adjacent, it'south time to begin filling in the features.
We'll starting time locate the eyes in the confront.
Horizontally, the eyes are more often than not plant merely below the centerline of the face up, making the centerline the brow line.
Vertically, yous can brand two new guidelines exactly halfway betwixt the vertical centerline and each side of the confront.
These volition locate the center of the eyes.
Once you've plant the proper location, the centre of the eyes should be placed only below the browline.
Step 6 – Draw the Optics

Now that we've plant the location of the eyes, we can depict them at the marked location.
For getting the width of the optics, the measure out from ear to ear should be split into v eye lengths, the 2d and 4th of which is where yous can place the optics.
Each ear volition be accounted for within the oval, so the five heart lengths should exist measured to the oval'due south inner edge.
The optics are almond geometric shapes, and the pupils are a circumvolve.
The outer edge of the centre slants in toward the nose.
Step seven – Draw the Nose
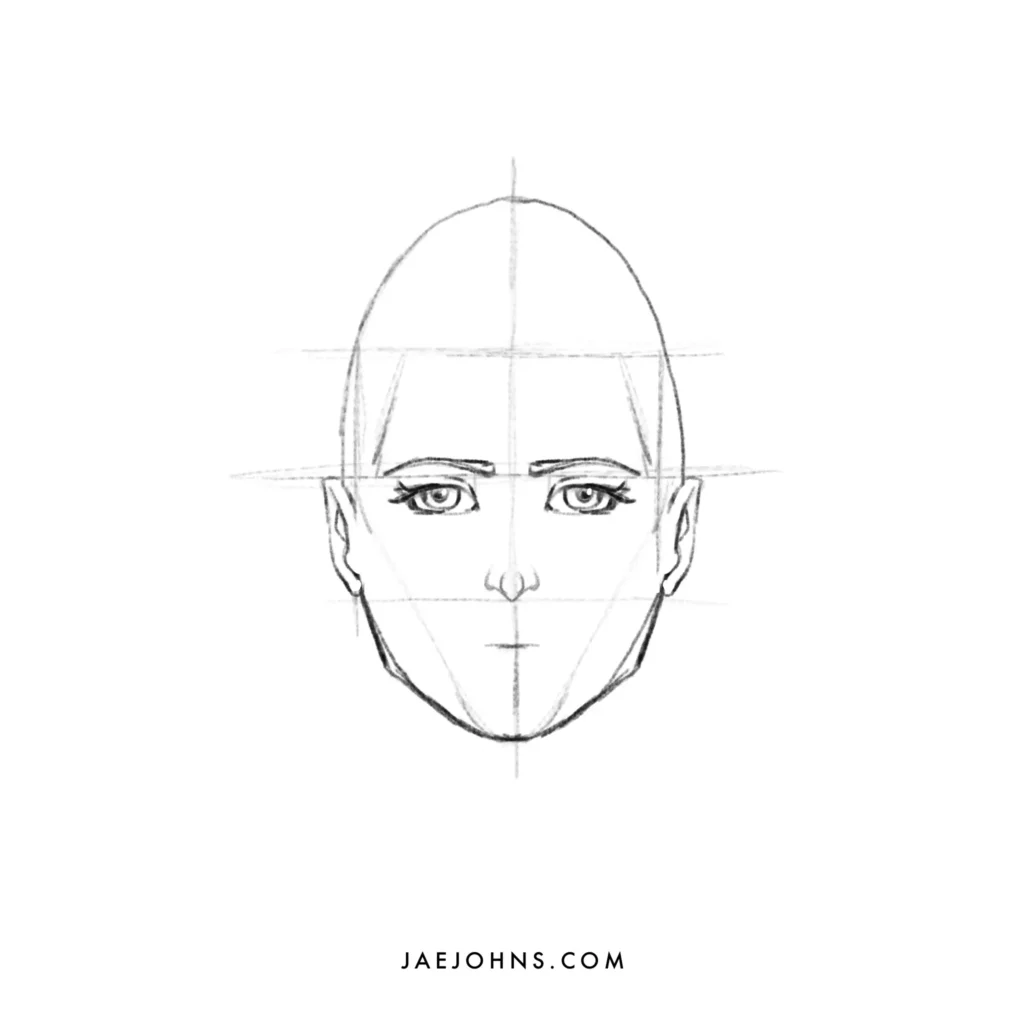
The bottom of the nose is found at the lesser line of the ear.
The region that defines the nose length runs from the bottom tip upwardly to the eyebrows.
Noses can vary in length merely are predetermined past the proportions of the eyes and rima oris.
Sketch out the base of the olfactory organ and a nostril on each side.
The width of the nose varies widely depending on the person.
The average nose might exist between the corners of the eyes (thereby taking upwardly the width of the center heart measurement).
Some artists draw guidelines down from the corners of the eyes to get this width correct.
Yous can look at a nose tutorial for more detailed instructions.
Step viii – Depict the Oral fissure
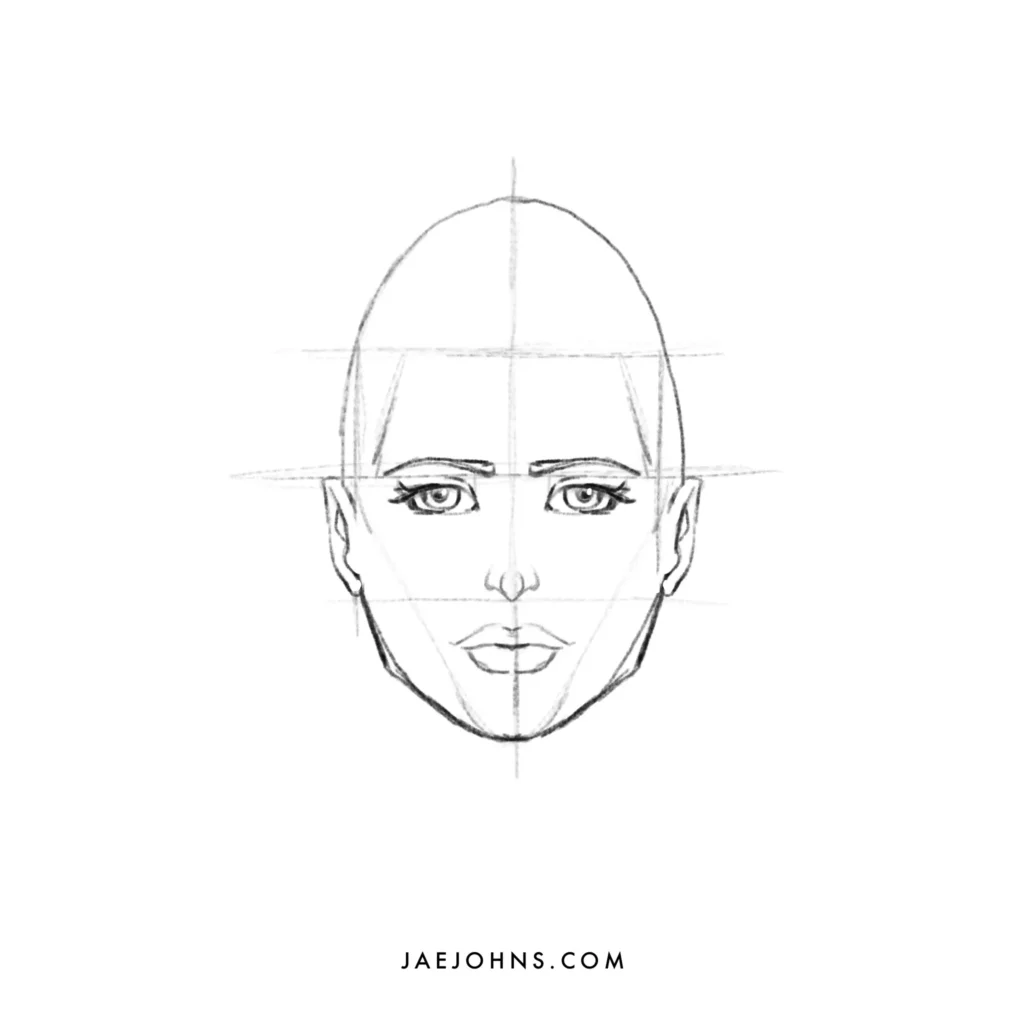
The mouth is by and large a scrap above the halfway distance between the bottom of the nose and the chin line.
A realistic oral fissure is another highly variable feature.
Leave a space between the top lips and the bottom of the olfactory organ.
The corners of the rima oris should line up with the center of each eye.
Therefore, once you lot sketch in the pupils, you can apply these are guidelines to draw the edges of the mouth.
Stride 9 – Draw the Hairline
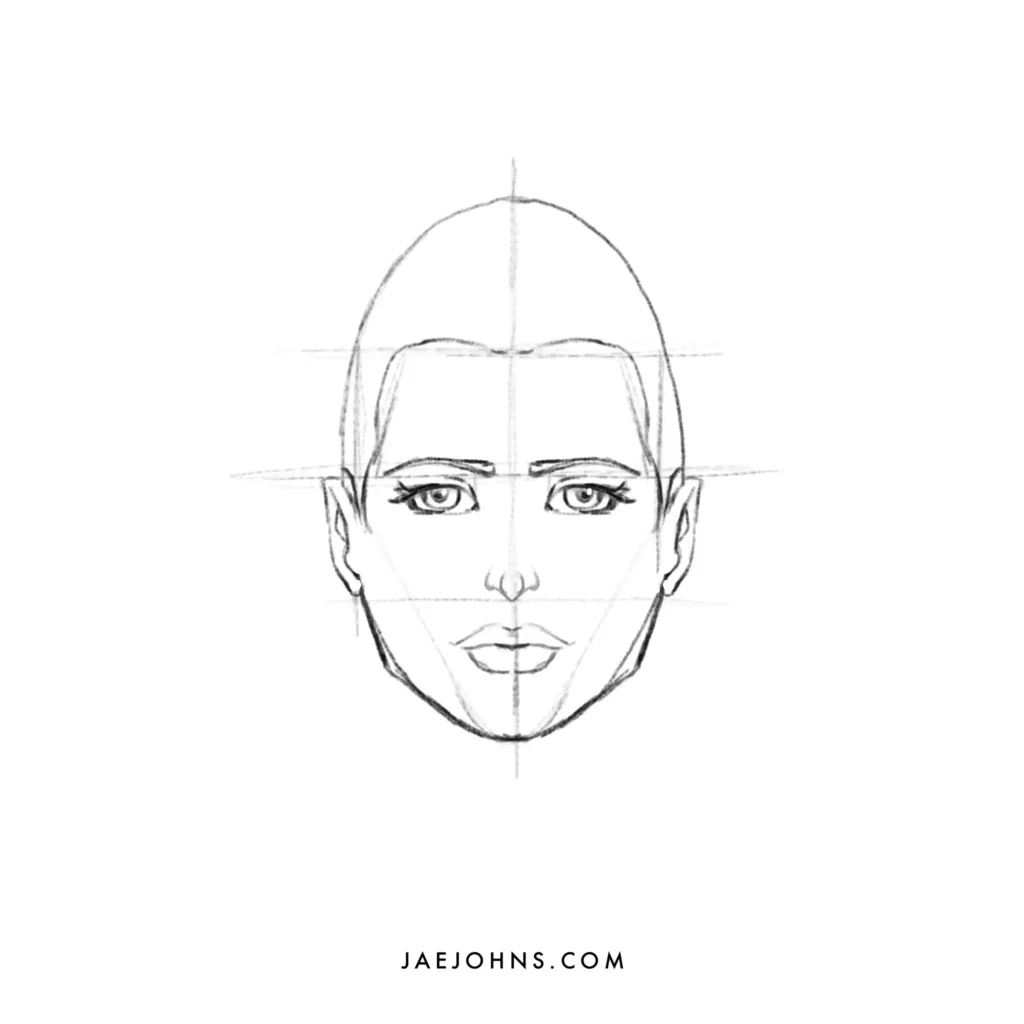
It's of import to know where the hairline begins regardless of whether some of the hair will be covering their forehead.
The hairline is the top edge of the square we drew at the get-go.
But, hairlines vary profoundly depending on age, gender, and other factors.
Step 10 – Describe the Hair
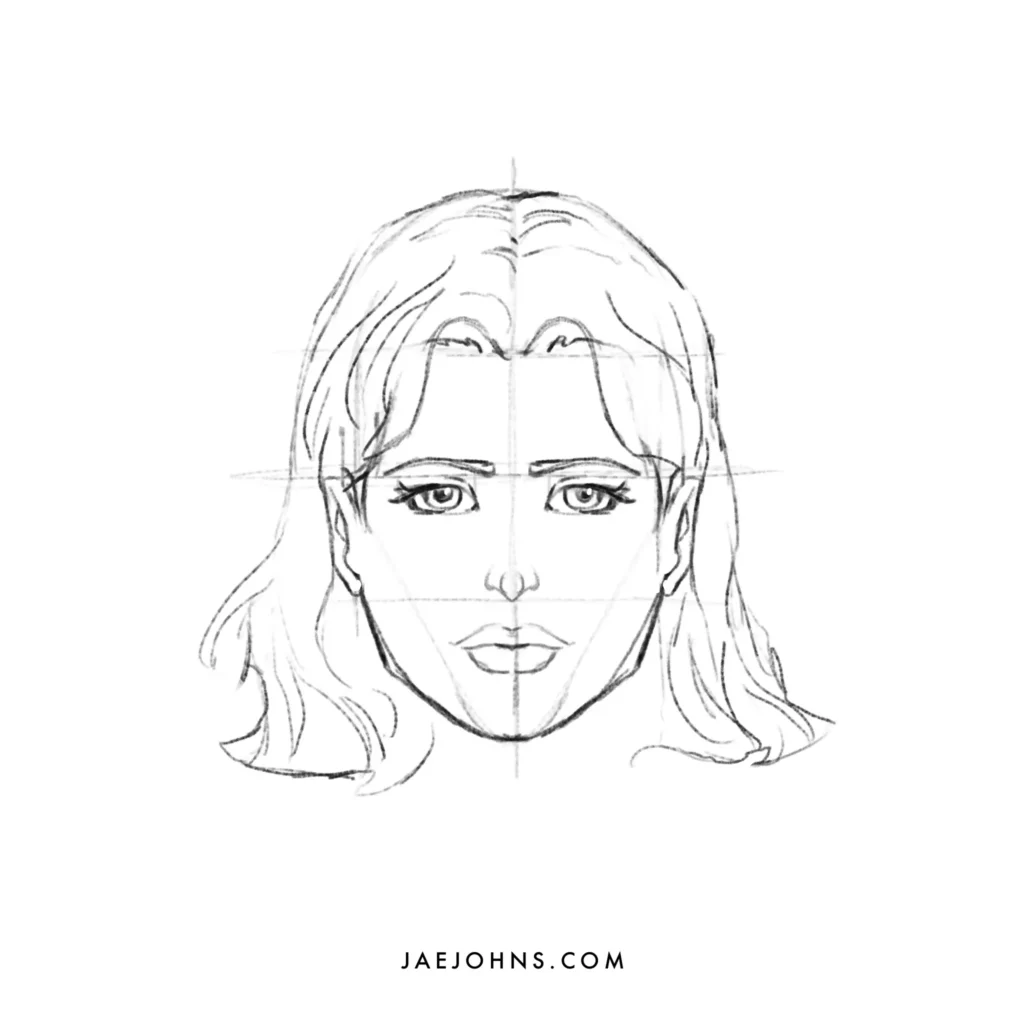
For shorter pilus, the hair should stick straight up from the skin.
The pilus may brainstorm to fall slightly from the top for slightly longer, and unlike hairstyles will have unlike patterns.
Never draw the hair straight on the scalp, merely allow it to extend outwards from the scalp with its length.
Stride 11 – Describe the Cervix
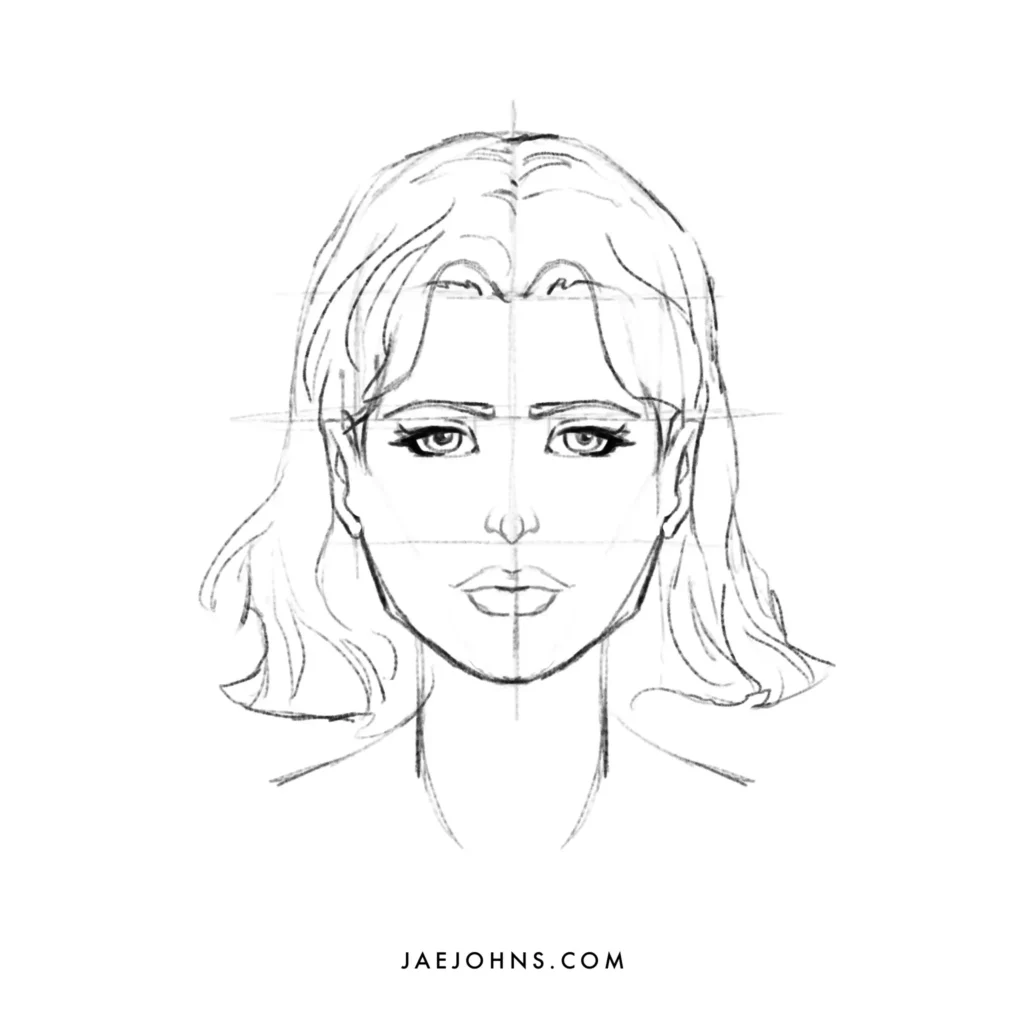
To cease up our floating head, we'll demand to add in the neck.
Unfortunately, most artists tend to describe the neck too narrow for realistic proportions.
Generally, the cervix begins from the lesser of each ear, although womans' necks are more slender.
Read Also:
- Acme x Gratis Drawing Books
- Top 10 Tips to Drawing Backgrounds Like a Pro
Drawing a Face from a Three-Quarter View
Next is an excellent step-by-step tutorial of a face seen from a three-quarter plough.
This should give you a proficient idea of who to begin considering the shape and proportions of the face from different angles.
Premium acid-costless paper works well for this kind of cartoon.
Step ane – Draw the Confront Structure

We'll exist using a different technique to exercise a portrait of your bailiwick from a three-quarter turn.
This step-past-step arroyo should expand your view of dissimilar ways to come across a face in a drawing.
Begin past cartoon an oval shape for the face.
Once y'all have the oval shape, yous'll be cartoon the vertical line slightly to the correct of the center.
Then, identify ane horizontal line through the heart, and one in the midway point between the meridian and the midline, and another from the bottom and the midline.
This should split the face up into four equal parts.
Each part indicates i of where the olfactory organ, eyebrows, and hairline will go.
Step 2 – Locating the Hairline, Mouth, and Ears
The horizontal lines at present act equally markers for the hairline, mouth, and ears.
For example, sketch the hairline from the top line curving down to backside the ears, which is just below the center line.
For rima oris position, draw a line about a quarter of the way down between the bottom line and the chin.
The bottom line volition act every bit the bottom of the nose, while this new line volition be the heart of the mouth.
Describe the ears with the pinnacle of the ear simply touching the eye line and the bottom of the ear beginning but a quarter of the way up from the lesser line.
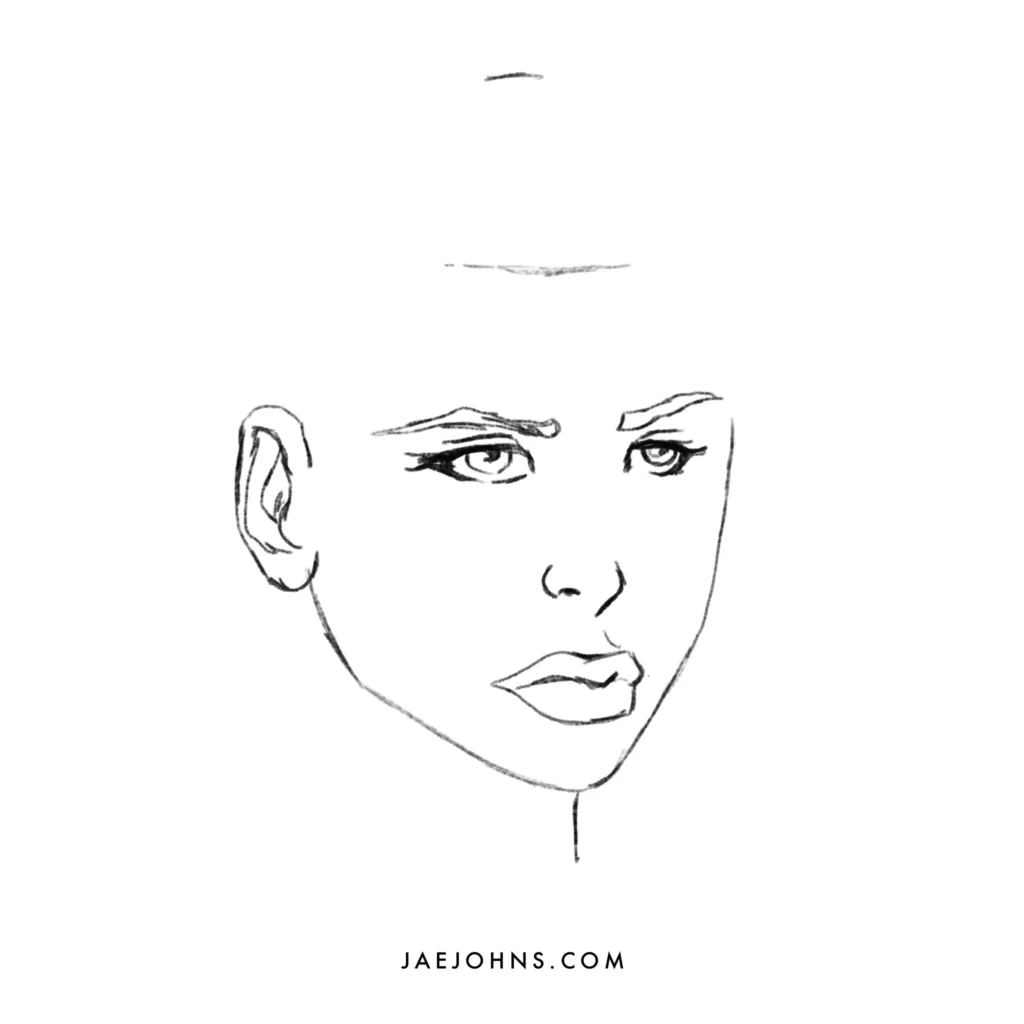
Pace 3 – Describe the Eyebrows, Eyes, Lips, and Olfactory organ
The eyebrows should be fatigued with the bottom tip counterbalanced on the second line.
It can be a tricky field of study, but the countenance angles can assist make up one's mind the overall shape of the confront.
For a proportionate nose, draw the lesser tip and nostrils to line up with the bottom of the earlobe merely above the centerline.
Then, to describe the lips, use the mouth line created above as the role betwixt the top and bottom lips.
There should be a pocket-sized infinite betwixt the height lip and the nose.
For the eyes, draw three lines across the centerline to make the highest and everyman points of the eye and for the outside corners.
The very edge of each nostril should line upwards vertically with the border of the inner corner of the eye.
The pupil should prevarication at the eye of the eye for a neutral position, but depending on the angle can be placed a piddling to the left or the correct to line upward as the person looks forward.
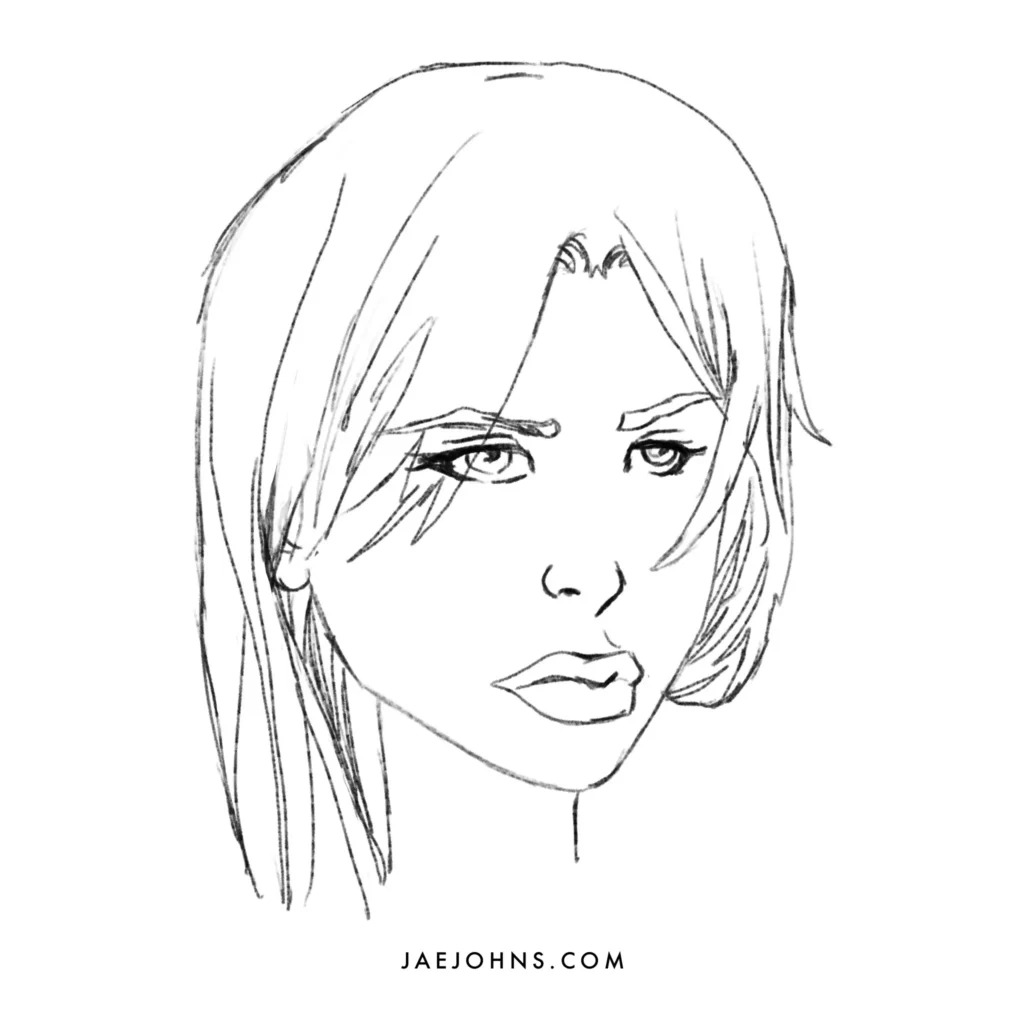
Step 4 – Erase the Guidelines, Fill in the Details
Once you've placed all the facial features, information technology's time to use an eraser to remove the supporting lines.
You can ink the main features and erase the pencil lines beneath to do this, or simply trace the supporting lines more lightly than the finished lines every bit you draw.
At present is the time for details and carving out the realistic shape of each characteristic amend.
For example, you lot tin add curved, organic lines to each of the features, and better define each facial characteristic.
The lips and ears can be given pocket-size shadows to increase their depth.
Draw the groove above the mouth and below the nose.
Yous tin also draw the neck and collar of a shirt.
Step v – Describe the Hair
The hair book should be drawn every bit coming out from the hairline organically.
Shorter hair will stick upwardly straight, while longer and bushier hair volition come out in volumes that from the scalp outwards.
The hairline can start as a dark space that grows out from a management in space outwards.
Strands of hair and their exact flow is an fine art that needs to be studied and teased out on its own.
Hair growth, including facial features, acts differently at different stages, plus differently for the four different types of pilus.
Step 6 – Light and Shadow
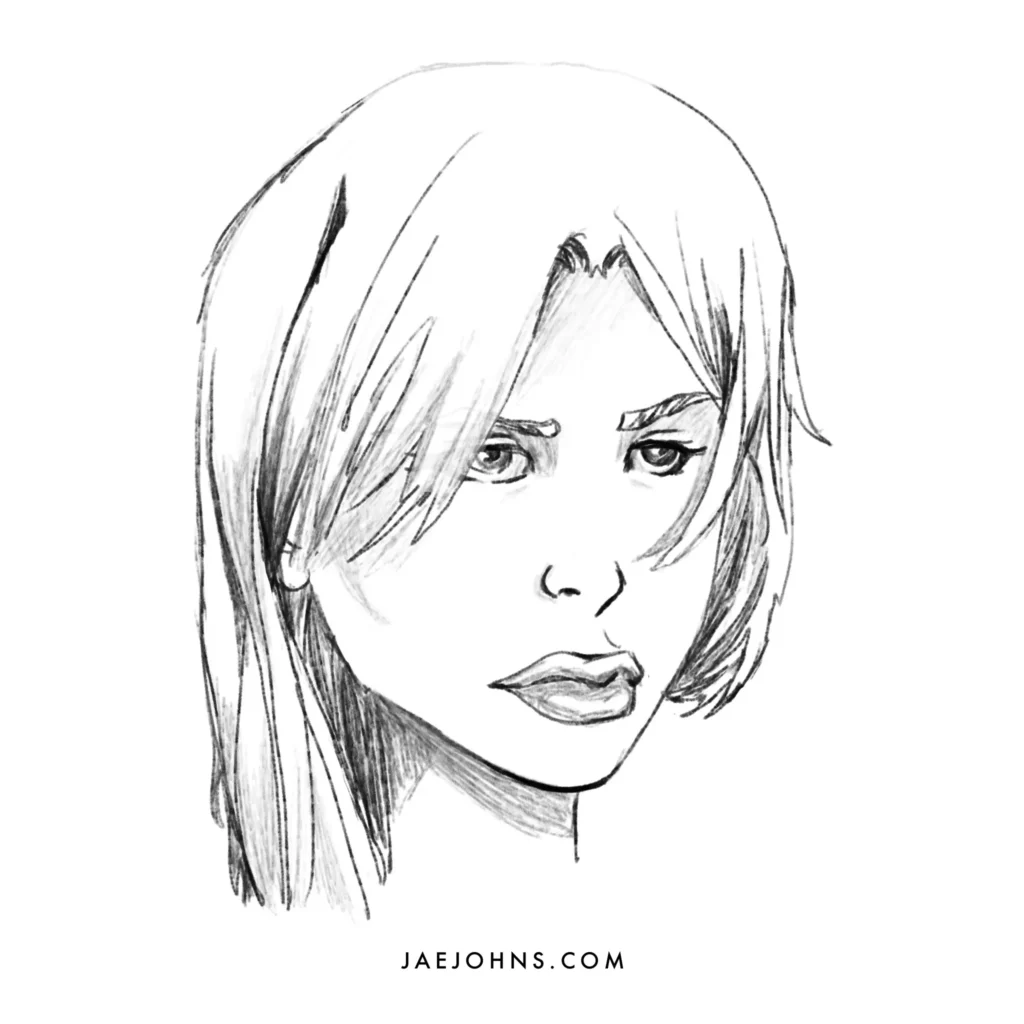
How bands of light and the behavior of light generally fall on the face up tin can be shown with proper shading.
Even a bit of shading allows for the difference between a dark edge and a light edge to give a more three-dimensional view of the face.
The elements of shading the difficult features of the face up are some of the hardest to go precisely correct.
Look for good instruction on shading to assist y'all understand the light lines and how to capture them adequately.
Key features of the face will pop in one case you lot accept a proper understanding of the concept of shading.
Differences in Men's and Women's faces
General differences

Generally, men'southward faces are longer and larger, merely this essential point doesn't assistance draw them too much.
A good general rule of thumb is to draw males with more than square shapes and females with rounder shapes.
Both men and women make intriguing subjects, so don't neglect either of them.
Eyebrows
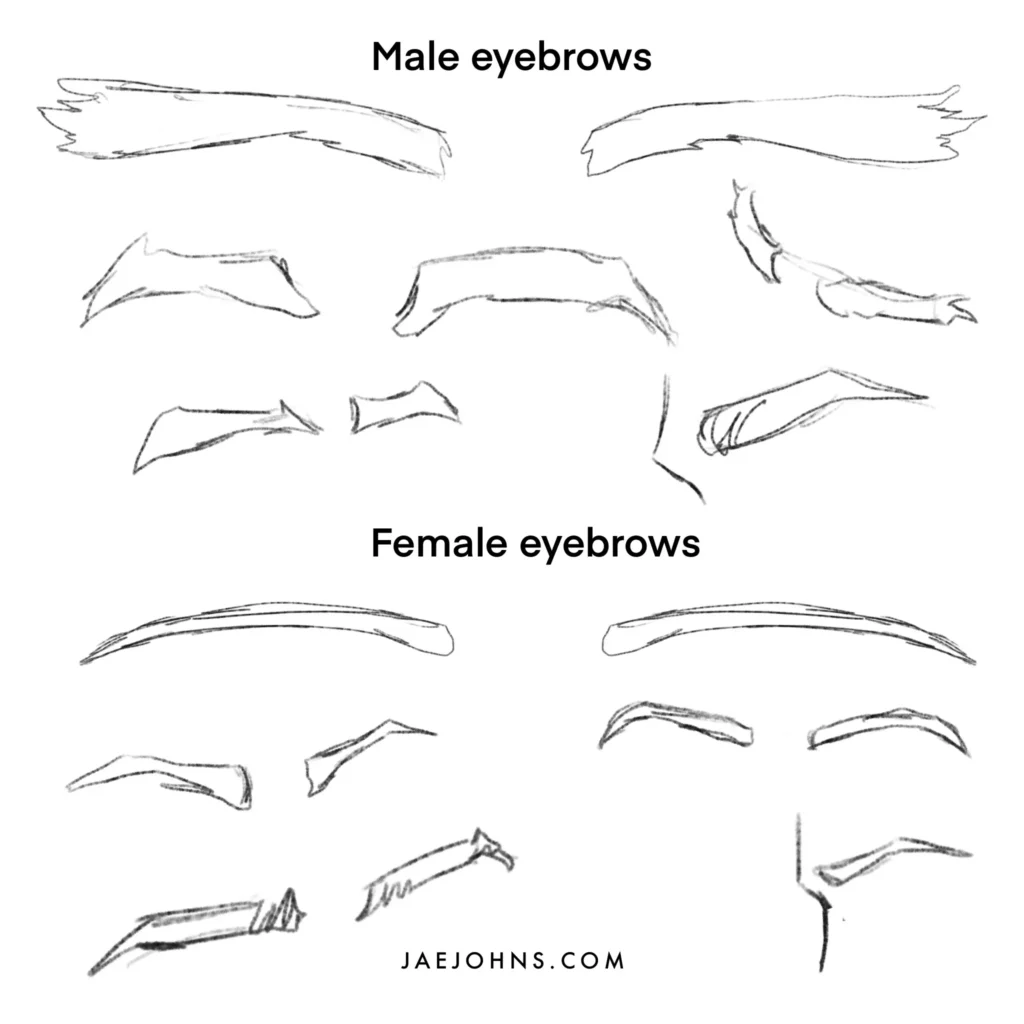
Men tend to have bushier, thicker eyebrows, whereas women tend to have thinner eyebrows.
Eyebrows can play a pregnant role equally a gender indicator.
Some men have thin eyebrows, and some women have thick ones, only overall the trend is strong in the other management.
Furthermore, men'southward eyebrows tend to be more angular, coming to an sharp terminate at the three-quarter mark then trailing downwards.
Women's eyebrows tend to moving ridge slightly and take more of a general bend.
Eyes

For female person portrait drawings, center shapes can exist fabricated more feminine by adding longer lashes that curl outwards.
This helps to make the eyes look bigger.
You lot tin also make the eyelashes thicker, darker, or more compact to give the impression of wearing mascara.
The base shape of the feminine centre should be an oval.
For a male portrait, the lashes should be kept short or non at all.
This doesn't work for a close-up shot, simply they tin be avoided to make the man appear more masculine for many other portraits.
The base shape of the male person middle should exist more rectangular.
Nose

Feminine noses tend to be as minimal equally possible.
The portrait does better if the focus is on the eyes and the lips.
In that location can still be some character to the olfactory organ, but by and large speaking, the nose can be kept to a minimum in comparison to the other facial features.
The prominent nose features for women tend to be the tip and nostrils, minimizing the bridge.
Male noses can add a masculine touch to a portrait past adding angularity and precipitous edges.
Expect for square and rectangular shapes on the nose.
Cheekbones
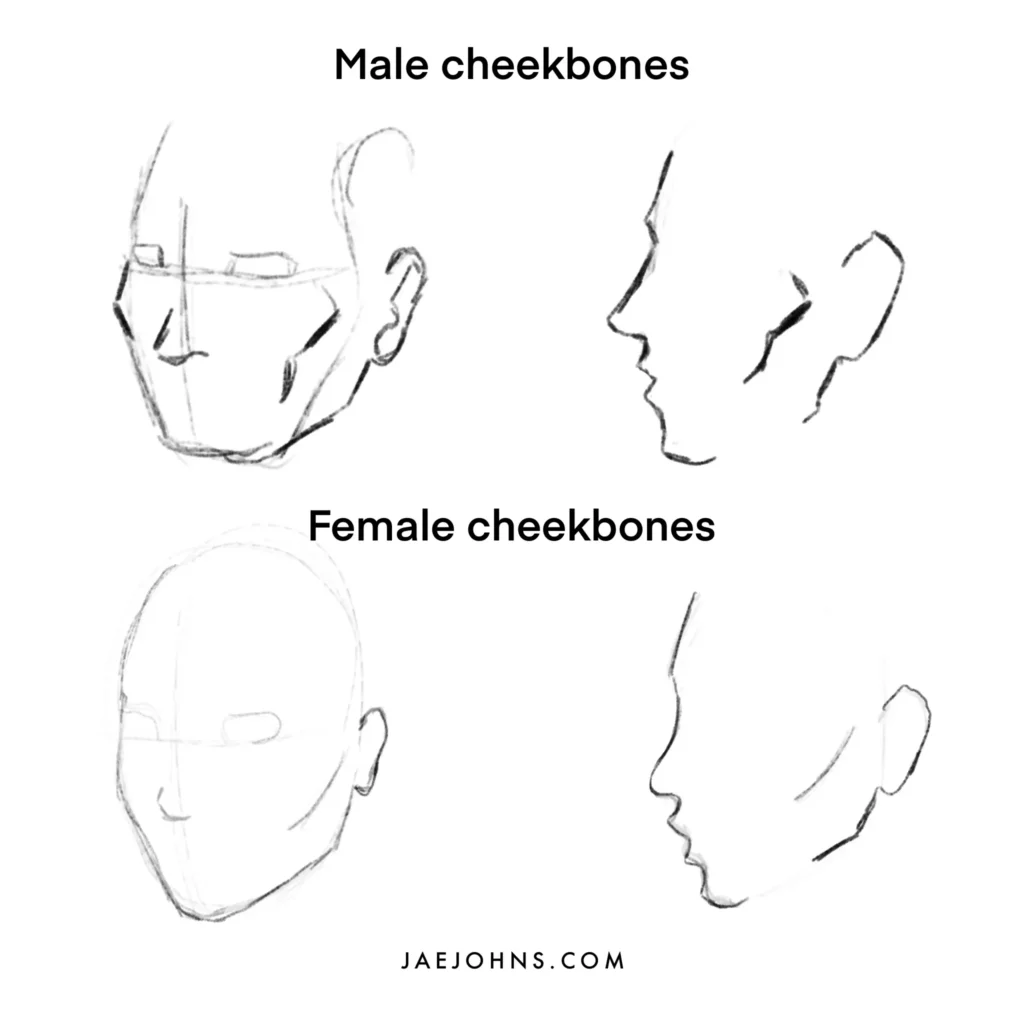
The primary way to show cheekbones is through the low-cal and shadow regions of the cheek.
Just, you tin also add together a very thin line to testify where the cheekbone would be.
Shading can likewise be an essential aspect of carving out the cheekbones.
More than other features, the patterns of low-cal on the face will make the cheeks visible.
The beliefs of light shows gradations from light to dark.
For a human being, y'all tin draw the bottom border of the cheekbone, allowing you lot to ascertain the lower surface area of the confront with a sharp cutoff.
Women are unlike in that yous want to proceed the cheeks looking rounded and softer.
And then instead of giving a harsh cutoff, put item into the top role underneath the eye.
Rima oris and Lips

The mouth can differentiate male person and female faces.
Sometimes, you tin can leave out the upper lip entirely with men to quickly give a more masculine wait.
On the other hand, you lot tin go with a skinny upper lip and a wider overall rima oris if that is as well unrealistic for yous.
With female mouths, the reverse is true.
Accentuating the upper lip will immediately requite a feminine impression.
Upper lip angles don't matter much every bit long as the lip is nowadays.
Regardless of the overall mode of the lip, detailing the upper lip volition help to give the portrait a more feminine air and works from a diverseness of angles.
Jawline
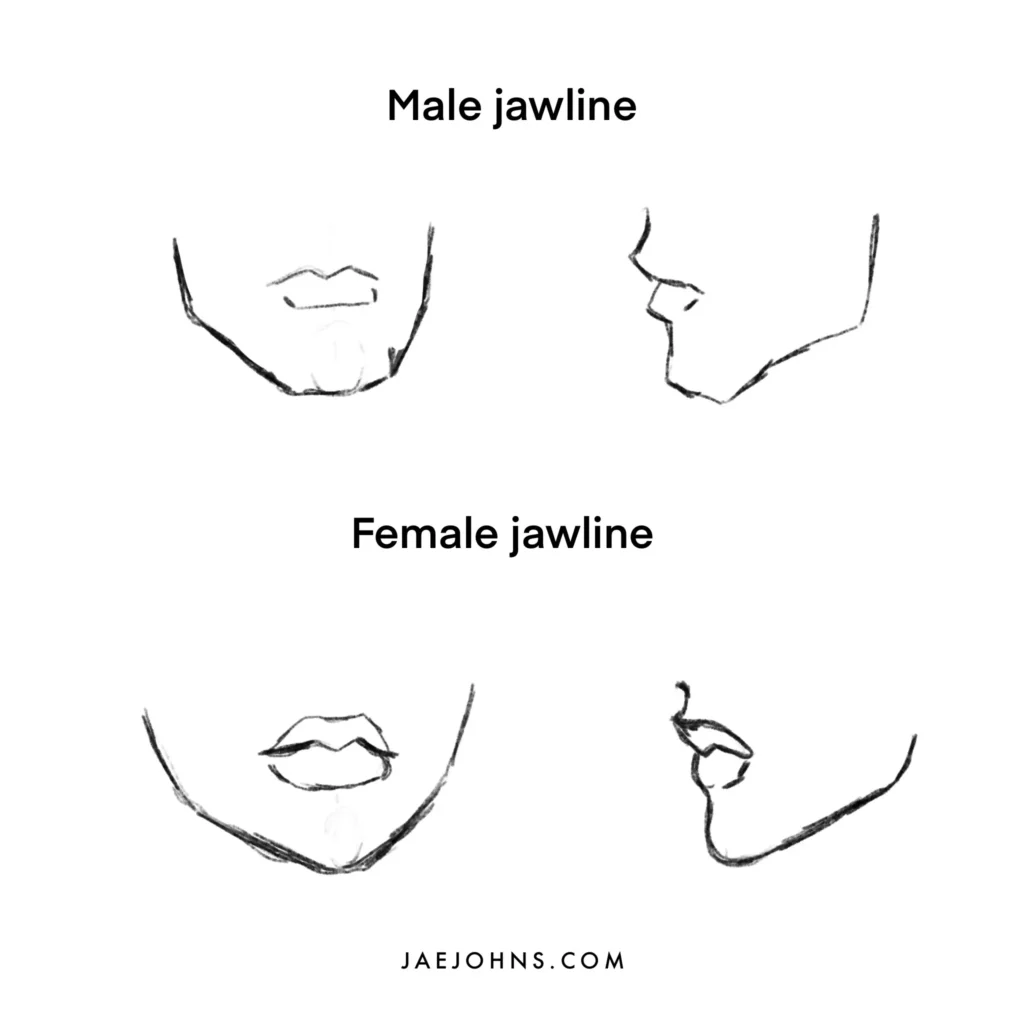
The jawline defines both the chin and the jaw of the portrait.
This follows the basic principles I've been saying.
A more than angular, foursquare jaw will look very masculine, whereas more rounded, soft curves will look very feminine.
For a masculine jaw, put a lot of focus and detail into the thick, sharp lines of the jawline and chin.
For the feminine jaw, drawing the to the lowest degree attention to the jawline and chine is all-time.
Neck
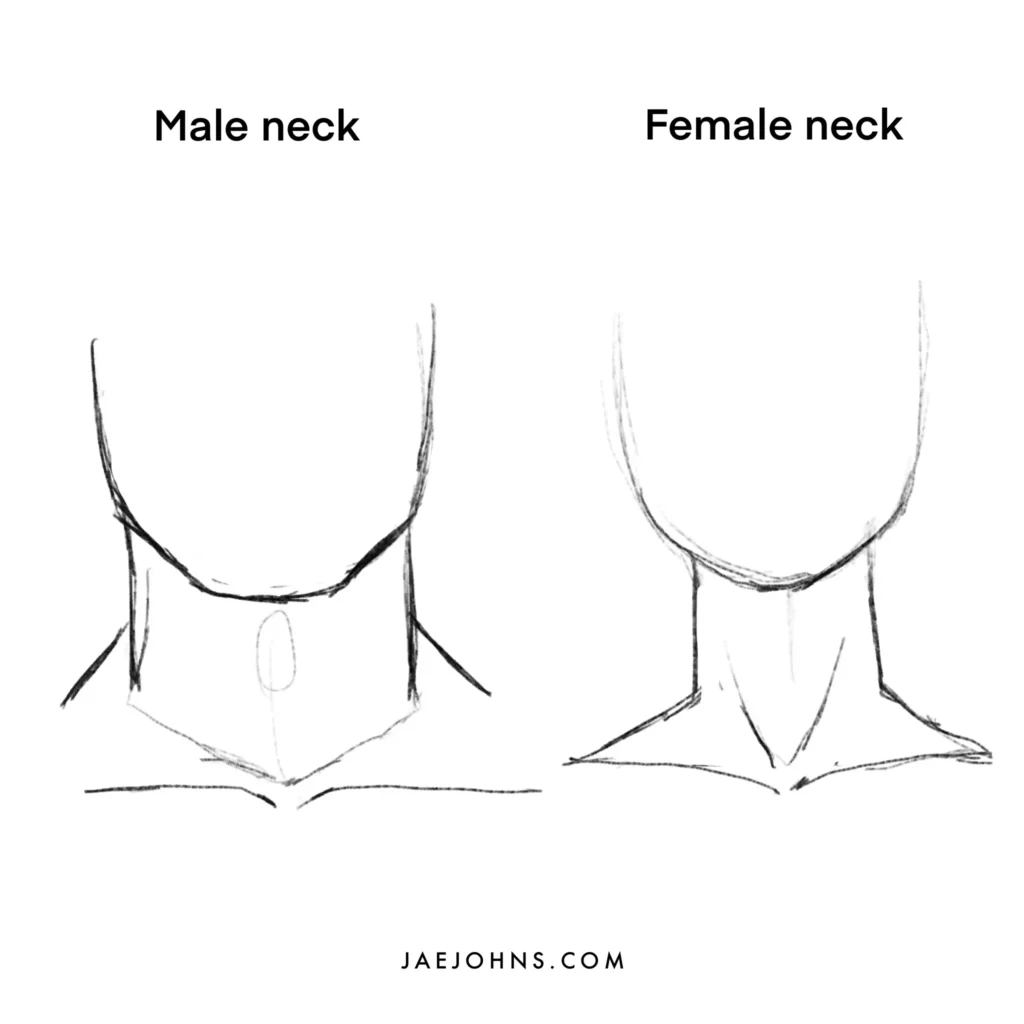
A quick and easy first to a men's cervix is the adam's apple.
Even a tiny line to give it a shape can help.
On a broader note, thin, graceful necks tend to exist more female person, whereas thick, more muscular necks tend to lean male.
You can as well consider skin tones at this stage, as the texture of peel for each gender tends to be slightly different.
For example, male skin is thicker, rougher, and darker, whereas women's skin tends to be thinner, smoother, and more uniform in color.
Pilus
Facial hair is perhaps the easiest giveaway of a male-looking face up.
Even just the shade of a five o ' clock shadow can do a lot.
Yet, a male featured face will stay masculine even with long hair and no facial hair, and so the features can do a lot of work.
Similarly, feminine facial features will remain feminine even with curt hair or a buzzcut.
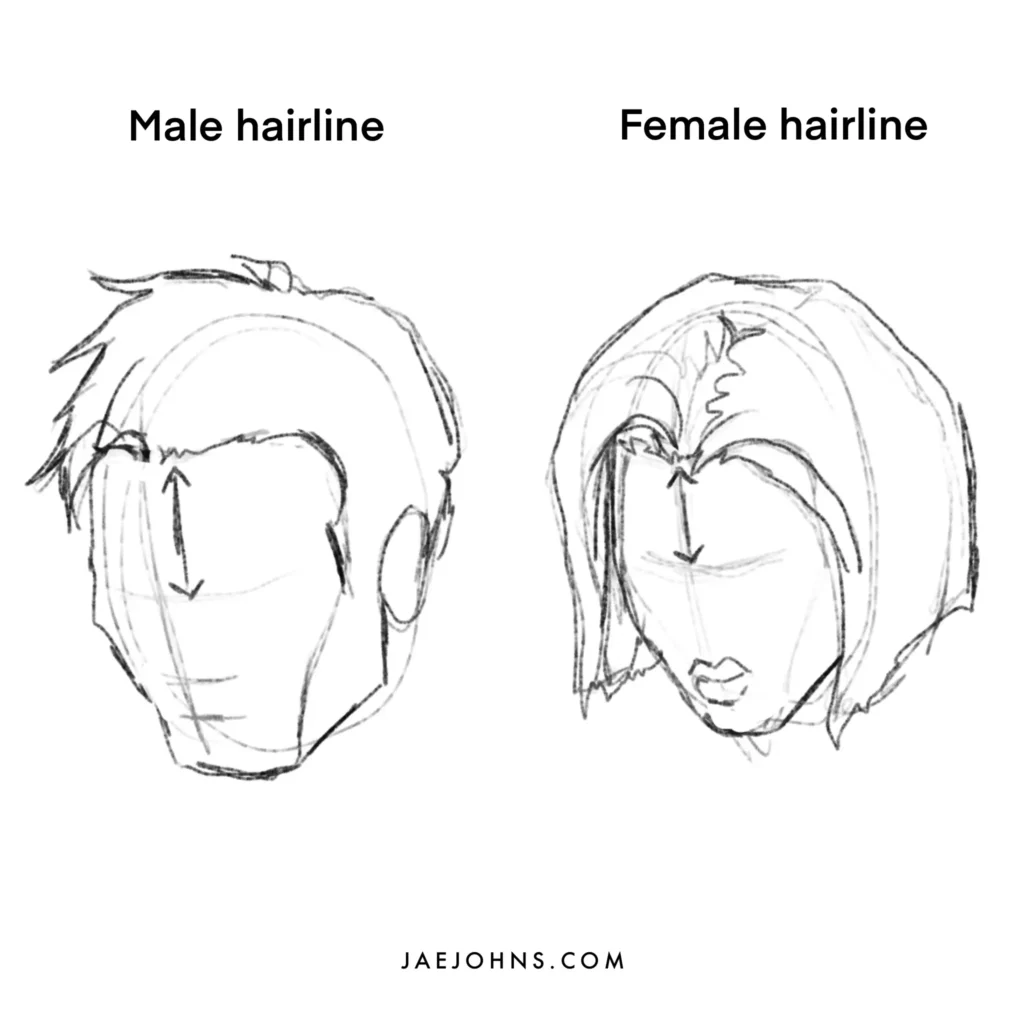
The hairline can be pretty dissimilar too.
A man's hairline tends to be further dorsum, especially as he gets older.
This means their foreheads are more prominent.
The hairline on a adult female is more rounded, with less of a widow'south peak.
Men tend to lose the pilus in a higher place the temples first, giving their hairline a kind of heart shape.
And that'southward it for differences to brand a portrait look more male or female person.
Determination
I hope this pace by step approach helps you lot at drawing faces.
Cartoon a face is all nigh proportions at start.
Getting the proper measurements between features and understanding those proportions at different angles is at the heart of all outstanding portraiture.
After that, it becomes a study of the details in the features of the face and learning how to create the shape of those features with the least particular possible, affirming the shape of the face.
Mastering these aspects of portraiture will practice you well for the rest of your fourth dimension as an creative person.

Source: https://jaejohns.com/drawing-faces/
Posted by: borgesrintormus.blogspot.com
0 Response to "how to draw face step by step"
Post a Comment